WordPress 外観 > カスタマイズのメニュー追加と削除の方法
WordPressには「外観」というメニューがあり、その中の「カスタマイズ」を開くと次のような画面が開き、WordPressのサイト情報などを修正する事ができます。
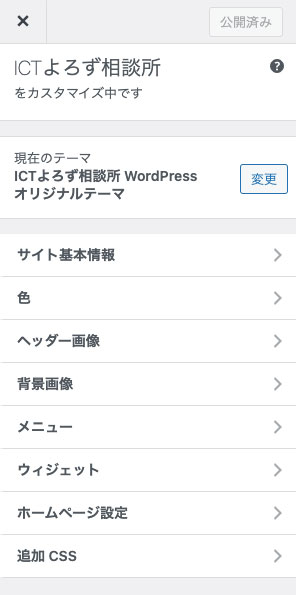
上記の例は一部の機能が追加されているいWordPressの外観カスタマイズとなります。
(インストールしているWordPressテーマにより内容は異なります)
標準の外観カスタマイズでは
- サイト基本情報
- 色
- ヘッダー画像(追加)
- 背景画像(追加)
- メニュー
- ウィジェット(追加)
- ホームページ設定
- 追加CSS
がありますが、この内容を削除する事ができます。
また、標準の外観カスタマイズではなく
- ロゴ
- スライダー
- SNSアカウント
など、独自のメニューを追加する事が可能です。
以下の画面は、ロゴ・スライダー・SNSアカウントを追加した例となります。

外観 > カスタマイズのメニューの削除
まず最初に、WordPressメニュー外観>カスタマイズのメニューを削除する方法を紹介します。
function my_customize_register($wp_customize) {
  $wp_customize->remove_section("title_tagline"); // サイト基本情報の削除
  $wp_customize->remove_section("colors"); // 色の削除
  $wp_customize->remove_section("header_image"); // ヘッダー画像の削除
  $wp_customize->remove_section("background_image"); // 背景画像の削除
  $wp_customize->remove_section("static_front_page"); // ホームページ設定の削除
  $wp_customize->remove_section("custom_css"); // 追加CSSの削除
}
add_action('customize_register', 'my_customize_register' );
アクションフック add_action(‘customize_register’, ‘my_customize_register’ ); を記載して、関数my_customize_registerを作成します。引数は$wp_customizeです。
$wp_customize->remove_section()の中に記述したそれぞれの内容によりメニューを削除する事が可能です。
- ウィジェットとメニューの削除方法は確認中です。
外観>カスタマイズのメニューの追加方法
続いて、WordPressメニュー外観>カスタマイズのメニューを追加する方法を紹介します。
function my_customize_register($wp_customize) {
  	// logo section
	$wp_customize->add_section('ict_section_logo' , array(
    	'title' => 'Logo',
		'priority'   => 10,
	));
	$wp_customize->add_setting('ict_logo_img', array(
		'default' => get_theme_mod('ict_logo_img'),
		'sanitize_callback' => 'esc_url_raw'
    ));
	$wp_customize->add_control( new WP_Customize_Image_Control( $wp_customize, 'ict_logo_img', array(
		'label' => 'Logo Image',
		'section' => 'ict_section_logo',
		'settings' => 'ict_logo_img',
		'description' => 'Setting Logo Image.',
	)));

	// Slider section
	$wp_customize->add_section('ict_section_slider' , array(
    	'title' => 'Slider',
		'priority'   => 20,
	));
	$wp_customize->add_setting('ict_slider_img_1', array(
		'default' => get_theme_mod('ict_slider_img_1'),
		'sanitize_callback' => 'esc_url_raw'
    ));
	$wp_customize->add_control( new WP_Customize_Image_Control( $wp_customize, 'ict_slider_img_1', array(
		'label' => 'Slider Image',
		'section' => 'ict_section_slider',
		'settings' => 'ict_slider_img_1',
		'description' => 'First Slide',
	)));


	// SNS section
	$wp_customize->add_section('ict_section_sns' , array(
    	'title' => 'SNS Acount',
		'priority'   => 30,
	));
	$wp_customize->add_setting('ict_sns_twiter', array(
		'default' => '',
		'sanitize_callback' => 'sanitize_text_field'
	));
	$wp_customize->add_control('ict_sns_twiter', array(
		'section'     => 'ict_section_sns',
		'settings'    => 'ict_sns_twiter',
		'label'       => 'Twitter',
		'type'        => 'text'
	));
}
add_action('customize_register', 'my_customize_register' );
テーマ設定の追加、セクションの追加、コントロールの追加を行います。
以下の箇所が該当の部分となります。
- テーマ設定の追加:$wp_customize->add_setting
- セクションの追加:$wp_customize->add_section
- コントロールの追加:$wp_customize->add_control
詳細についてはWordPressCodexの「テーマカスタマイズ API」をご覧いただくと理解が深まると思います。
参考情報
テーマカスタマイズ API
https://wpdocs.osdn.jp/%E3%83%86%E3%83%BC%E3%83%9E%E3%82%AB%E3%82%B9%E3%82%BF%E3%83%9E%E3%82%A4%E3%82%BA_API